|
Directory Introduction
Quick search
Advanced search
Actions on Existing Members/Contacts
View/Edit/Modify Member Information
Remove Members/Contacts
Modify Profile
Reset Passwords
Download Members/Contacts
Add Contacts as Members
Send Mail
Add Members/Contacts
Add a Member to the Interest Group
Add a Member using Sign up
Create a Person and assign Interest Group Membership
Bulk Upload Members/Contacts
Access Control
User Account Information
Personal Information
User Preferences
Mailing Lists Memberships
Memberships
|
Directory Service
Introduction
The Directory Service contains both the Contacts and the Members
of your Interest Group.
Member: Represents an Interest Group user (known as "IG Member") with
authorized access to the system via a User Name (or Sign in Name) and a Password.
The Who is who has a functionality called "roles". If
the roles are enabled, then it is possible to add a role as member to this
interest group. All users belonging to the particular role will have access
to the interest group with the permissions of the role.
Contact: Represents an Interest Group affiliate (contact) person who does
not have authorization to access the Interest Group services.
The Directory Service offers a number of functionalities depending on your
Access Profile privileges. For example an Access User can only Search for
Interest Group Members or Contact persons, whereas a Leader can Create
Members and Contacts, turn existing Contacts to Members and Vice Versa.
In addition the Leader may apply Access Controls to the Interest Group
Directory.
Quick Search
To Search for Interest Group Members and Contacts you need to follow the steps
presented below:
-
Click on the DIRECTORY button to access the
Interest Group Directory Service. Select the
 "Quick Search"
button. The Search form will be displayed to search for Members and Contacts
in the Interest Group Directory. Enter/type the name or part of the name of
the person at the "Name contains:" field [valid values: all characters] and press the "Search" button. "Quick Search"
button. The Search form will be displayed to search for Members and Contacts
in the Interest Group Directory. Enter/type the name or part of the name of
the person at the "Name contains:" field [valid values: all characters] and press the "Search" button.
If you leave the "Name contains:" field empty and press the "Search"
button, CIRCA will display all Members and Contacts of the Interest Group. If the
Interest Group Leader has imported external profiles, the members of the imported profiles will
also appear in the search results users list. The imported profile format is denoted as
"IGroup:Profile".
 |
The difference between an Interest Group Contact and an
Interest Group Member is that the former is not associated with a Profile and possibly a
User Name. Thus entries with a dash (-) in the Profile and User Name fields represent
Contact persons. |
| |
When using the "Advanced Search" fuctionality keep in mind that all the search field mentioned above are case-sensitive (e.g. surnames Smith and smith are considered different when performing a search for "surnames starting with 's' ": smith will be returned but not Smith since it starts with an uppercase 's'.)
|
- You may press the
 button to display the
information in Compact mode, or alternatively press the button to display the
information in Compact mode, or alternatively press the  button to display the information in "Detailed view" mode. You may use the "Previous"
or the "Next" button to move from one page to another, if the list of Members
and Contacts, is longer than 10 lines (the default). You may click
on "First Name", "Surname", "User Name",
"Email" or "Profile" (the headers of the list) to
sort the displayed listing accordingly. button to display the information in "Detailed view" mode. You may use the "Previous"
or the "Next" button to move from one page to another, if the list of Members
and Contacts, is longer than 10 lines (the default). You may click
on "First Name", "Surname", "User Name",
"Email" or "Profile" (the headers of the list) to
sort the displayed listing accordingly.
| |
You may send an E-mail message to any Member or Contact
person, by simply pressing on his/her E-mail address. Depending on your Access
Rights you can trigger specific actions for selected Members or Contacts at the
directory listing. The entire range of these functionalities is described in the Actions
on Existing Members/Contacts Section hereafter. |
Advanced Search
Depending on your Access Rights, you may Search for Members and/or
Contacts in the Interest Group Directory or the Who is who
(access to the Who is who is usually only available to Leaders).
In order to do that, follow the steps presented below:
- Click on the "DIRECTORY" button to access the Interest
Group Directory Service. Then, select the
 "Advanced Search" icon. You may specify the
following search parameters: "Advanced Search" icon. You may specify the
following search parameters:
- Search in Domain: To specify the Domain your search will occur into. If no Domains (other
from the circa one) are available, this attribute is not rendered at all and
the circa one is implied. In the circa Domain you can search for:
- Members of the specific Interest Group.
- Contacts of the specific Interest Group.
- Members and Contacts of the specific Interest Group.
- For users at the Who is who level.
Otherwise, if Domains (other from the circa one) are available, you can search in a Remote Domain
or in All Domains for:
- Members of the specific Interest Group.
- For users at the Who is who level.
- Search for: To specify what your search will look for. Possible values include the search for
Interest Group Members, Contacts, Members/Contacts or the
Who is who central directory. The first three options restrict your search to the Interest Group
while the Who is who option provides users with Administrative Access Right the ability to search
the central directory.
|
Who is who is the centralized persons
directory that CIRCA maintains for all the virtual CIRCAs. It is unique for each site
and its main purpose is to provide fast access to a large directory of persons providing
functions for quick maintenance, easy and friendly navigation.
The persons stored in the Who is who can become Members or Contacts of any CIRCA
Interest Group.
Different levels of access are defined allowing authorized users to have
administration access whereas the rest of the users can modify only their
personal data. In addition, Interest Group Leaders can view the details of each member
of the Who is who using the 'Advanced Search' mechanism of their Interest Group.
|
- Profile:To restrict your search to a particular Profile (Leader, Access, Author,
Contributor, Secretary, any Profile or an imported Profile) you should subsequently define one
or more fields to carry out your search. The following fields are at your disposal:
- User Name: the User ID of the member or user
- First Name: the person's first name
- Surname: the person's surname
- Full Name: the person's full name
- Title: the person's title
- Organisation: the person's organisation ID if the organisation object exists, otherwise a text
- E-mail address: the person's E-mail address
- Phone: the person's phone number
- Fax: the person's fax number
- URL address: the person's URL address
- Postal address: the person's postal address
- Description: the person's description
- Interests: the person's interest keywords (used by the "What's new" search mechanism from within the CIRCA and IGs home pages).
- Select a suitable field operator. Available options include: "Sounds like",
"Is", "Contains", "Starts with",
"Ends with" and "Is not",
Select the  button to expand your Search options criteria by
adding a new search field. You should then provide a suitable Search Argument in
the corresponding field [valid values: all characters]. button to expand your Search options criteria by
adding a new search field. You should then provide a suitable Search Argument in
the corresponding field [valid values: all characters].
Use the  button to remove an existing search field. button to remove an existing search field.
- You may modify the default values for Maximum Results per Page (how many
entries will appear in one page) [valid values: all characters but
in case it contains non-numeric characters it will use the default setting] and the Maximum Hits
(the total number of entries returned by the server) [Type: all characters but in case it
contains non-numeric characters it will use the default setting].
|
Note: The initial value of the Maximum Results/Hits setting is 100. This value can be changed
in the User Preferences. |
- Finally, press the "Search" button to launch the query and get the results.
|
You can use the button
to display the results in Compact mode, or the
button to display the results in Detailed view mode. Use the "Previous"
and the "Next" button to move from page to page in case the number of entries
returned exceeds one page. You can press on the "First Name",
"Surname", "User Name",
"Email" or "Profile" buttons to sort
the list accordingly. You may send an E-mail message to a Member or
Contact person, by simply pressing on his/her E-mail address. Depending
on your Access Rights you can trigger specific actions for a selected
Members or Contacts at the directory listing. The entire range of these
functionalities is described in the Actions on Existing Members/Contacts
(next). |
Actions on Existing Members/Contacts
Once the Interest Group Members and/or Contacts is displayed, you may
apply any of the following functionalities:
- View/Edit/Modify Member Information: Except for Leaders, Interest Group Members
can only modify their own account Information.
- Remove Members/Contacts:The Interest
Group Leader can remove/delete an Interest Group Members or Contact.
- Modify Profile: For Interest Group Leaders
and Administrators, allow the modification of Members' Profiles.
- Reset Passwords: For Interest Group Leaders
and Administrators, allows the reset of the password of one or more members of their
Interest Group.
- Download Members/Contacts: You may select (by checking the little box next to a user's entry) and
download in an MS-Excel compatible format, a list of interest Group Members
and/or Contacts.
- Add Contacts as Members: A Leader may turn
an Interest Group Contact to an Interest Group Member thus enabling authorised
access to the Interest Group.
- Send Mail: A Leader may
send an email to the selected Interest Group Member or Contact
|
The "Add as Members",
"Send Mail" and "Download" apply only for Members
of type "user" and not to Members of type "role". |
View/Edit/Modify Member Information
You can view and modify your own personal information and if allowed member's information.
Via the Directory Search result, follow the steps presented below:
- Place a check mark next in the tick box on the left of the name of the person
you wish to view/edit. Tick only one person.
- Press the "Details" button to access the member's Personal Information
stored at the Directory Server. If it is your personal information you may modify
any of the following fields:
Certificate, First Name, Surname, Password (Verify), Title, Organisation, Postal address, Description, Email, Phone, Fax and URL address.
If you have Administration Access Rights you may also modify the Profile field of all members, and the Password field (as long as the member is not a Who is who service administrator in an other virtual circa). If you have Leader Access Rights you may also modify the Profile field of all members, but not the Password field.
|
If you use a Certificate, you can modify it (e.g. in
case it expires) by copy-pasting the keystore content from the pem file to the provided textbox.
|
- Press the "Save" button to save your changes. A confirmation message with your modifications will be displayed
- Press the "OK" button to return to the "Search" page.
|
If you are a member of the 'Who is who Administrators',
you may modify the Personal Information of any Member by following the steps just
described. As a Member (with no Administrative Access Rights) you are not authorised to
modify the Personal Information of other members. You may only view (Read Access) their
Personal Information and modify your own. |
Remove Members/Contacts
If you have Administrative Access Rights in the Directory Service, you can
remove Members or Contacts. In order to do that, follow the steps presented
below:
- Place a check mark in the tick box on the left of the name of the Member(s)
or Contact(s) you wish to remove from the Interest Group Directory.
- Press the "Remove Members" (or "Remove Contacts" , or "Remove Members/Contacts" respectively)
button and the system will automatically prompt you about the Members or Contacts removal.
- Press the "Continue" button to remove the selected entries and return to
the "Search" page.
|
Multiple selections and the subsequent removal of Members
and Contacts are also available. |
Modify Profile
If you have Administrative Access Rights in the Directory Service, you can
modify a member's Profile. In order to do that, follow the steps presented
below:
- Place a check mark in the tick box on the left of the name of the Member(s)
or Contact(s) whose Profile you wish to modify.
- Press the "Modify Profile" button and the system will automatically prompt
you with a list of available Profiles.
- Select the new Profile to be assigned from the pull-down menu and then press the
"Continue" button for the changes to take place.
|
Multiple selections for the Profile Modification of Members
and Contacts are also available. |
Reset Passwords
If you have Administrative Access Rights in the Directory Service, or if you are the Interest Group's Leader you can reset the passwords of one or more members of the interest group. The procedure is as follows:
- Place a check mark in the tick box on the left of the name of the Member(s),
whose password(s) you want to reset.
- Press the "Reset Password" button to actually reset the password(s) of the
selected member(s).
Local Domain Users
The passwords of users that belong to the local domain (e.q. circa) are recreated (similar to the ones created during the 'Sign up' procedure) and send via email to these user(s).
You will see a page containing a transaction number for each user of the local domain whose password has been reset. These transaction numbers must be forwarded to the users because they are required in the next time a user Signs in to the CIRCA application. For security reasons and because the passwords have been transmitted to users by e-mail, you are advised to avoid transmitting the transaction numbers also by e-mail. It is recommended to communicate them orally or by fax.
After the user types the transaction number and specifies his/her new password, he/she is presented a list of Interest Groups where he/she is Member of and a list of Interest Groups where he/she can apply for membership.
If the user wishes to change his/her password later, he/she can click on the exit (X) button in the footer of the page. In this case, the user will be asked to provide the transaction number again, next time.
The email sent to the users states the time period within they
must Sign in to the CIRCA application. If this time period elapses, the users will have to request an Interest Group leader or CIRCA administrator to reset again their password.
Remote Domain Users
The passwords of users that belong to remote domain(s) (e.g. cec) will not be modified. Instead, the functionality can be used to expire the cache that CIRCA keeps for accounts of these users. Therefore, by resetting the password of a user of a remote domain, the user will be forced to be authenticated directly by the remote directory service the next time that he/she will access the site.
|
This functionality may be disabled by your CIRCA Site
Administrator. |
Download Members/Contacts
Members with Administrative Access Rights in the Directory Service can download
any set of Members or Contacts from the Directory listing.
In order to do that, follow the steps presented below:
- Place a check mark in the tick box on the left of the name of the Member(s)
or Contact(s) you wish to download (you can also click on the select all
button to select all members).
- Press the "Download" button and the system will prompt you to save the file.
Note: If you have selected one (or more) Roles to download, there will be no
entries for them in the downloaded file. Also if you have selected to download a mixture of Roles
and Members/Contacts, the file will only include the entries for Members/Contacts.
|
You should save the file with the extension .xls (MS-Excel),
by replacing the default extension of .dld. This is vital since it will enable you to
directly process the file with MS-Excel. You may open and further process (edit,
modify...) the downloaded file. For a sample file containing Contact/Member click
here.
|
|
The file must be saved as "Tab delimited text file" and not
Excel format, if you envisage to use it in CIRCA for bulk upload operation (see hereafter)
|
|
When this tab-separated file is opened with MS Excel,
in Step 2 of the "Text Import Wizard", there is an option for the "Text qualifier",
which by default is the double quote, but the user is cautioned to select the {none} option from the relevant menu, to avoid any problems from the presence of double quotes in the file contents. |
Row 1 presents the standard header common for both Members and Contacts.
This header must always be present, having the same number and order of columns as
above as well as the same field names.
Row 2 presents a Member entry.
Row 3 presents a Contact entry.
|
Please note that a Member differs from a
Contact in the "Profile" field. In case of a Contact the,
"Profile" field is blank. Both Contacts and Members
may have a User Name. If a Contact has a user name, the Interest Group Leader
can turn him into an Interest Group Member. |
Add Contacts as Members
This functionality is available only for Interest Group Leaders and
Administrators. It enables them to turn a Contact Person into an Interest Group
Member. In order to do that, follow the steps presented below:
- Place a check mark in the tick box on the left of the name of the
Contact(s) person you intend to provide Interest Group Membership. Verify that
the Contact person has a User Name (check the corresponding field).
- Select the "Add as Members" button and the system will prompt you with
a confirmation message. Assign the new member to a Profile, using
the drop-down menu.
- Select the "Continue" button to complete the operation. You will then return
to the "Search" page. You may then verify that the new member
has been added to your Interest Group.
|
The "Add as Members" applies only for
Members of type "user" and not to Members of type "role". |
|
A specific Person can be a "Contact" in one
Interest Group and a "Member" in another, at the same time. The only difference
between a "Contact" and a "Member" is the existence
of the Profile status in case of a Member user. Contacts can have both
a User Name and a Password and not be members of any Interest Group.
In such case the person accessing CIRCA, will see the message "Sign in
access is enabled" but no accessible Interest Groups will be listed. |
Send Mail
This functionality is only available to Interest Group Leaders and
Administrators. It enables them to send an email to a selected group of Members.
To do that you may follow the steps presented below:
- Place a check mark in the tick box on the left of the name of the person(s)
you intend to send mail to and click on the "Send Mail" button.
- You will then be presented with the email message form where you should define the rest
of the fields:
- Your Subject,
- Enable or Disable copy of the email to your mail account,
- Enable or Disable receipts (for proper delivery and email read receipt),
- Enable or Disable Encryption (only for recipients with Certificates),
- Type in the message body,
- Specify whether you wish to attach a file (The "Browse" button can be used to select the file to attach),
- Press the "Send Mail" button to send the mail to the selected recipient(s).
|
The Send Email applies only for Members of type
"User" and not to Member s of type "Role". |
Add Members/Contacts
To add Contacts or Members to your Interest Group you need to have Administrative Access
Rights, or be a member of Profile "Leader" over the Directory Service.
In order to do that, follow the steps presented below:
Click on the "DIRECTORY" toolbar icon to access
the Interest Group Directory Service. Select the  "Add Members"
icon. CIRCA will display the Member(s)/Contact(s)
screen and you are presented with the following options: "Add Members"
icon. CIRCA will display the Member(s)/Contact(s)
screen and you are presented with the following options:
- Add one Person or Role as Member to the Interest Group
- Create a Person and assign Membership
- Bulk Upload Interest Group Members/Contacts
Add a Member to the Interest Group
To add a Member to the Interest Group, the corresponding person or role must already
exist in the Who is who and have a user or role name. You may then follow the
steps presented below:
- Choose between "User Name:" and "Role Name:"
[valid values: predefined values].
- Fill in the corresponding field with the name of the person or role you wish to assign access to the Interest Group [valid values: all characters. The person or role must exist and must not be a contact or member of the group]. Select a Domain from the drop-down menu.
- Select a Profile from the drop down menu.
- Press the "Add Member" button to complete the operation. You will be
prompted with the message "Member(Role) XXXXX has been added successfully".
- Press the "OK" button to return to the "Add Member" page.
|
The "User Name" or "Role Name"
must belong to an existing user or role respectively in the "Who is who".
Otherwise the assignment to the Interest Group will fail. |
Add a Member using Sign up
This functionality is available only for Interest Group Leaders. It enables them to create
a CIRCA user and assign him/her Membership in the Interest Group, using the
"Sign up" mechanism.
In order to do that, press the "Add Member using Sign up" button. Fill the
form that will appear, following the instructions in the
"Sign up" section in the
main help page of CIRCA. The user will be created and inserted as Member in the Interest
Group. Also he/she will be notified for the new membership by an automatically
created email containing the username and password. You will be presented with a printer
friendly form with the transaction numbers. This transaction number must be forwarded
to the user because it is required the first time that the user Signs in to
the CIRCA application. For security reasons and because the new password has been transmitted to the
user by e-mail, you are advised to avoid transmitting the transaction number also by e-mail. It is
recommended to communicate it orally or by fax.
After the user types the transaction number and specifies his/her new password, he/she is presented a list of Interest Groups where he/she is Member of and list of Interest Groups where he/she can apply for membership.
If the user wishes to change his/her password later, he/she can click on the exit (X) button on footer of the page. In this case, the user will be asked to provide the transaction number again, next time.
If the user does not Sign in to the CIRCA application within the time period specified
by his email he will be removed. After the removal, the Leaders of the Interest Groups
where this user is a member will be notified about his removal.
Create a Person and assign Interest Group Membership
Users with Administrative Access Rights in the Who is who may create new persons in the Directory
and directly add them as Members of the Interest Group. In order to do that you may proceed as follows:
- Click on the "DIRECTORY" button
to access the Interest Group Directory Service. Press the "Add Member" icon.
- Press the "Create Person"
button to access the Who is who Member/Contact Creation form. Complete
the relevant fields, including the Profile and press the "Save" button.
- Press the "OK" button to return to the Add Member page.
|
In order to create a Contact, do not provide a User Name
or a Password. In order to Create a Member provide data for the "User Name"
and "Password fields" as well as the Profile. |
Bulk Upload Members/Contacts
Users with Administrative Access Rights or members of Profile "Leader" can upload
many Persons as Members or Contacts at once (bulk upload) to the Interest Group
Directory. The file should be a Tab-Delimited text file. The first line of this text file
should contain the fields listed below:
First Name
Surname
Title
Organisation
Email address
Phone
Fax
URL address
Postal address
Description
User Name
Profile
For an example click
here.
Row1 contains the Header. It must always be present and exactly as shown
in the example (same titles, same order of columns).
Row2 contains an example of a Contact entry.
Row3 contains an example of Member entry. You may use the following values in
the Profile Field: Access, Secretary, Contributor, Author,
Leader as well as any new Profile that might have been created by the
Leader of the Interest Group.
Once the file has been created you may proceed with the bulk upload as follows:
- Go to the "Bulk add members to the Directory" of the Directory upload form.
- Press the "Browse" button to locate the tab-delimited text file that contains
the Members and/or Contacts to be uploaded.[valid values: all
characters except &, (,), [,], `, ``].
- Press the "Upload Members" button. The Directory Server will inform you
that the selected users have been created as either Contacts or Members
depending on the structure of the file.
- Press the "OK" button to return to the "Add Member" page.
|
The Contacts and/or Members should be Users of
the Who is who prior to initiating any upload actions. Bulk upload can not be
used to upload Roles to the Directory. Use the Advanced Search option
to search and Download Members/Contacts information from the
Who is who. All users with Administrative
access in the Who is who have the possibility to bulk
upload users to the Interest Group Directory as well as create in the
Who is who in one operation. For this purpose, these users can check the "Add persons in
the Who is who also" check box. However, when a "Leader" uploads new users,
the application will also insert them in the Who is who.
The gist of the bulk upload algorithm is described below. |
"Bulk upload" can be used to perform three tasks:
- Add users that exist in Who is who, as "Members" or "Contacts" in
the Interest Group.
- Create new users in the Who is who and make them members or contacts
in the Interest Group at once. (Administrative access to Who is who
or membership of Profile "Leader" is required)
- Change the "Profile" of Interest Group members (or assign
a Profile to a Contact).
Template rules:
Row 1 in the template contains the Header. It must always be present and
exactly as shown in the template (same titles, same order of columns).
- First Name : the person's first name (*)
- Surname : the person's surname (*)
- Title : the person's title
- Organisation : the person's organisation ID if the organisation object exists,
otherwise a text.
- E-mail address : addresses the person's E-mail address (*)
- Phone : the person's phone number
- Fax : the person's fax number
- URL address : the person's URL address
- Postal address : the person's postal address
- Description : the person's description
- Username : the user ID and domain (UserID@domain) of the member or user
- Profile : You may use the following values in the Profile Field (**)
(*) First Name, Surname and E-mail are mandatory, if username is blank.
(**) "Access", "Secretary", "Contributor", "Author",
"Leader", "Contact" as well as any new Profile that might
have been created by the Leader of the Interest Group. A blank value in the Profile
field will cause an insert as 'Contact' in IG.
Particularly, for each line of the tab-delimited text file:
- If you have Administrative Access in the Who is Who:
- If "Add persons in the Who is who also" is not checked:
1.a If the line has a "User name" and Username exists in Who is who:
- If "Profile" is filled, user will be inserted in the IG in the specific
Profile, (if the user is already a member of the IG in a different Profile,
the Profile will be changed. If the user is Contact of the IG, the user will
be inserted as member).
- If "Profile" is empty, the user will be inserted as Contact in the IG.
1.b If the user does not exist in Who is who, or the line does
not contain a "User name", the line is not accepted.
- If "Add persons in the Who is who also" is checked.
2.a If the line has a "User name":
2.a.i If Username exists in Who is who go to case 1.a.
2.a.ii If Username does not exist.
First, the user will be inserted in Who is who. Especially:
-
If the provided "Email address" is identical to the Email address of another
Who is who user, the line is not accepted, otherwise
-
the user will be inserted in Who is who, with the given Username. Rules
applied to "Sign up" procedure (e.g. mandatory fields and fields
format) are also followed by "Bulk upload" functionality.
Then, the user will be inserted in IG as Member if there is a "Profile" or
as Contact.
2.b If the line does not have a "User name":
- First, CIRCA will automatically create a Username as a combination
of users first name and surname.
- Then, the user will be inserted with the new Username, in the
Who is who and then in the Interest Group, following the steps of the case
2.a.ii.
|
For members of Profile "Leader", the "Add persons in the
Who is who also" option is always checked even though it is not displayed.
If members of Profile "Leader" specify the "User name" when uploading a user this will only
cause modification of the member/contact value.
To upload a new user, the "User name" must be left empty. |
- If you do not have Administrative Rights in the Who is Who:
- If line has a "User name" and it also exists in Who is who:
1.a If "Profile" is filled, user will be inserted in the IG in the specific
Profile, (if the user is already a member of the IG in a different Profile,
the Profile will be changed. If the user is Contact of the IG, the user will
be inserted as member).
1.b If "Profile" is empty, the user will be inserted as Contact in the IG.
- If the line does not have a "User name":
- CIRCA will automatically create a Username as a combination
of users first name and surname. The user will be inserted with the new Username, in the
Who is who and then in the Interest Group as described in 1 above.
Extra information is provided when a line is rejected.
You will be presented with a printer friendly form with a transaction number for each user who
has been uploaded. This transaction number must be forwarded to the users because it is required
the first time that they will Signs in to the CIRCA application. For security reasons and because
the passwords have been transmitted to the user by e-mail, you are advised to avoid transmitting the
transaction numbers also by e-mail. It is recommended to communicate them orally or by fax.
Access Control
Users with Administrative Access Rights can Enable/Disable Public search
for Members and/or Contacts.
Public Search for Members: Controls public access for the Personal Data of your
Group Members. If public access is enabled, non-authenticated users will
be able to view all Personal Information except User Name and Profile.
Public Search for Contacts: Controls public access for the Personal Data of your
Group Contacts.
In order to do any of the above follow the steps presented below:
- Click on the "DIRECTORY" button to access
the Interest Group Directory Service and press the
 "Access
Control" icon. "Access
Control" icon.
- Press the "Enable/Disable" button to Enable/Disable Public Access
for Members or Contacts.
User Account Information
CIRCA provides you with the option to edit your Personal Information and configure your
Preferences applicable within the CIRCA environment. Your Personal Information is simply
your account information in the Directory Server.
Your Preferences is a set of options, which define the way the various types of information
available within your Interest Group will be displayed, viewed and sorted.
Personal Information
To edit/modify your Personal Information follow the steps presented below:
- From the CIRCA Home Index page press the Personal Information button to access
the Who is who service Personal Information of User form as presented below:
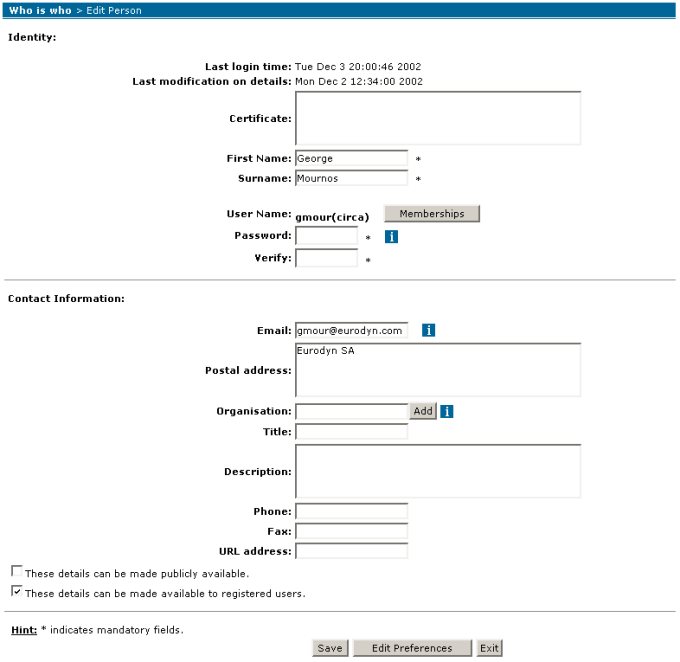
- Modify any of the above fields, with the exception of User name that can not be
modified. It is good practice to change your Password at regular intervals.
- Press the Save button.
|
The "Language" field has been eliminated and
the "Personal Information" of the user appears only in one language. |
|
The "Memberships" button leads to a new
separate window containing all the Profile and/or Role memberships for the current user.
Also, the user is a member of the relevant mailing lists for each one of his/her memberships. Please
refer to Mailing Lists Memberships
for a detailed overview of the feature. |
Mailing Lists Memberships
When a user belongs to a certain Interest Group Profile, he/she is at the same time a member of the
relevant Mailing List. The same applies for any Roles that a particular user is
potentially a member of.
To send a message to such Mailing Lists, one needs to properly construct the address
that the message should be sent to. To do so the email domain of the server where the
system has been physically installed must be known:
- IG Profile Mailing List Address: Profile_Name.IG_Name.TOP@ig.server_email_domain (i.e.: Author.v2_2.ig_v2_2@ig.tweety.eurodyn.com)
- Roles Mailing List Address: Role_Name@roles.server_email_domain (i.e.: nfp-fr@roles.tweety.eurodyn.com)
Since the above mentioned procedure can be rather cumbersome and error-prone, a
separate, more automated, mechanism has been developed to alleviate the procedure of
sending an email to a particular Membership Mailing List via the
Memberships area.
Within the User Personal Information area press the "Memberships"
button.
User Preferences
- Click on the "User Preferences" button that appears at the
CIRCA footer toolbar. Alternatively, you may select the "Edit Preferences"
button from the "Edit Person Form" or access the 'User Preferences' link in
the CIRCA instance home page.
- You will be presented with the Preferences definition form presented below.
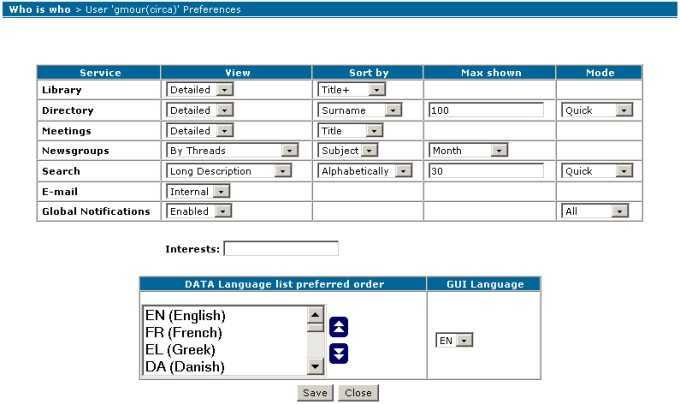
- From the drop-down menus define your personal preferences:
- Library: Define the view mode (Detailed or Compact) and select the sorting argument and sorting order for the Library Items (by Author, Version, Title, Size, Date in ascending [+] or descending [-] order).
- Directory: Define the view mode (Detailed or Compact), select the sorting
argument for the Directory Items (UserName, First Name, Surname, E-mail, URL Address,
Profile), define the Maximum Items to be displayed on a single page, and select the
preferred Search Mode (Quick, Advanced).
- Meetings: Define the view mode (Detailed or Compact), and select the sorting
argument for the Meetings (by Title, Date, Duration, Contact, Location).
- Newsgroups: Define the view mode (Detailed, Threads, Threads Reversed or Compact) and select
the sorting argument by (Subject, Date, Form) and the Maximum number of Items to be displayed by
(Day, Two Days, Week, Two Weeks, Month, Year, All).
- Search: Define the View mode (Compact Description, Long Description, Compact, All),
the sorting argument (Relevance, Category, Oldest, Newest, Alphabetical,
Reverse Alphabetical), the Maximum Items to be displayed on a single screen,
and the Search Mode (Quick, Advanced).
- E-mail: Internal or External. If the "External" option is chosen, CIRCA will launch
your preferred mail application when you click on a 'mail to' link in CIRCA.
If the "Internal" option is chosen, the CIRCA email interface will be used.
- Global Notifications: In the View column you can Globally "Enable" or
"Disable" the Notification Mechanism for all the Interest Groups. In the Mode column you
can specify the document languages which you wish to receive as notifications. The
available options are "All", "First One" and "First Five" languages from your
"DATA Language list preferred order" settings.
- Interests: Enter the keywords (comma separated) that will be used for the "What's New"
Search results for both the CIRCA as well as the Interest Group home pages. If left empty,
every new item accessible by you will appear in the "What's New"
table.
- DATA Language list preferred order: Define the preferred languages in which
the documents and metadata associated to those documents will be presented
to you (assuming the information and documents actually exist in that language)
e.g. if FR is your preferred language followed by EN, documents will be
presented in French if they are available in French, otherwise they will
be presented in English if they are available in English.
- GUI Language: By selecting the preferred GUI Language (DE, FR, or EN), the
CIRCA Graphic User Interface will automatically be adapted to the selected
language. The CIRCA GUI is only available in those three languages.
- Press the "Save" button to accept all your changes.
Memberships
The Memberships functionality displays your memberships in Interest Group Profiles, your memberships in 'Who is Who' Roles, as well as any CIRCA instance(s) that you administrate.
Interest Group Memberships
If you are a member of any Interest Group, your Profile memberships are presented in the table with title Member of the following IG(s).
This table has four columns:
- Circa: Logical Circa instance name which is a link to the logical circa instance home page.
- Interest Group: Interest Group name which is a link to the interest group home page.
- Profile: Name of the user Profile in the interest group which opens an email window in order to send an email to all users in the same profile.
- Select: A checkbox that can be used to select one or more membership items and then press the Remove me button to revoke the certain Interest Group Membership(s).
Roles Memberships
If you are a member of any Role, your Role memberships are presented in the table with title Member of the following Role(s).
This table has two columns:
- Role: The role name which opens an email window in order to send an email to all the members of the particular role.
- View role information: A link to the particular role information page.
CIRCA Administration
If you are a Circa administrator, a table is displayed with title "The user is also an Administrator in the following Circa:".
This table has two columns:
- Circa: The Logical Circa name which is a link to the logical circa instance home page.
- Administrator: The Administrator profile.
The button Erase me is displayed to users that are not Circa Administrators. When pressed it will delete all memberships from interest groups and roles, and the user details from the Circa application.
|
Note: The Membership tables list data from all the Logical Circa instances of this Site.
|
|